Continuous warping is an efficient method in which the tablets are threaded as a pack instead of individually. After warping, the tablets are flipped, turned, and sometimes moved to a different place in the pack before or during weaving to create different patterns and structures. This is the method that I teach in my workshops, and use in my all of my own work.
A variation of the continuous warp can be used for patterns determined by the threading, which require the use of a threading diagram. A good description of this process is in Tablet Weaving Magic by Otfried Staudigel.
The Process
Draw the A-B line. Use a wide felt-tipped marker in a bright color to draw a line connecting the A and B holes on both sides of every tablet. These lines are visual reference points which will be very helpful when you are flipping and turning tablets, and also during weaving to keep track of a turning sequence.
Set up the warping posts. The distance between the posts will be the length of the item you plan to weave plus an allowance for waste and take-up. When weaving a short, narrow warp with all the tablets in one pack, 18" is generally sufficient for waste and take-up. If using C-clamps instead of warping posts, tighten the clamps to the table, with the post ends facing up.
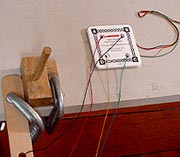
Attach the warping wand to the table just behind the left-hand warping post. Clamp the wand at a right angle to the long table edge. Place the clamp post-end down so it is out of the way. The warping wand helps keep the yarns from tangling during warping.
Place four cones, balls, or spools of yarn on the floor, directly beneath the holes in the warping wand. If using balls or spools, place them in containers to keep them clean and also to keep them from rolling around. Thread each end of yarn through the opening above it.
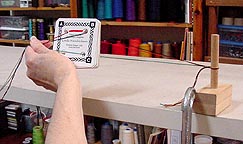
Arrange the tablets in a stack so they are all oriented the same way. Place them on the table.
To thread the tablets, thread one warp end through similarly-placed holes in all the tablets at once. Pull the end of yarn about two feet past the tablets. Repeat with the other three ends (one end through all of the A holes, one end through all of the B holes, etc.) If threading for the double-faced weave, put the background color in A and B, and the design color in C and D.
Even up the four warp ends and hold the four strands as one. Make a slip knot with a 4" tail at the end of the warp, loop the end over the right-hand clamp, and pull it tight.
To make the warp, you will pull the yarn through the tablets, in a clockwise direction around the clamps, and place the tablets, one at a time, on alternate sides of the tensioned warp, building the deck out from the center.
As you make the warp, hold the pack near you at all times -- do not pass it around the warping posts or the yarns will twist, making it difficult to continue warping. Also, do not rotate the pack, for the same reason. Keep the tension as even as possible while you make the warp.
Pick up the threaded pack of tablets. Bring your left hand under the yarns to the left of the pack, and pinch the four strands. Then rest the pack in your left palm. Make sure the pack is threaded to the left (as shown, with all four strands of yarn visible on the left side); flip it if necessary.
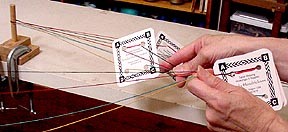
Take the tablet at the bottom of the pack and slide it away from the pack, toward the right-hand post. Let go of the tablet. As you drop the tablets, don't worry if they flip or turn. You will arrange them after you finish warping.
Use your right hand to grasp the four strands of yarn between the pack and the tablet you just dropped, and transfer the tension to your right hand.
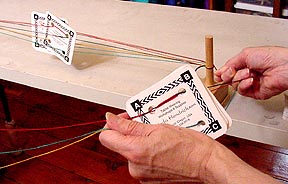
Hold the pack close to your body while you pull out some yarn and wrap it around the left-hand post.
As soon as you place the yarn around the post, immediately transfer the tension back to your left hand so you have a straight line of warp under tension from the post to the pack in your left hand.
Now you must place a tablet on the opposite side. Keep the warp under tension. Take one tablet from the bottom of the pack and slide it away from the pack, toward the left-hand post. Let go of the tablet. Grasp the yarn between the pack and the tablet, and transfer the tension to your right hand.
Hold the pack near you and carry the yarn plus the tablet over the warp that is already tensioned between the posts. Drop this second tablet near the first one. Wrap the yarn neatly around the right-hand clamp. Transfer the tension back to your left hand.
Straighten up the tablets that are on the tensioned warp. You don't need to flip or turn them as you make the warp, but straighten them up periodically to keep everything neat and orderly.
Repeat the steps above, always wrapping the yarn in the same place on the posts, until all of the tablets are hanging on the tensioned warp. After the last tablet is in position, cut the yarn a few inches beyond the right-hand clamp, and tie the end to the tail at the beginning of the warp. Straighten the tablets and arrange them for the desired pattern. You can push them toward the left-hand clamp to begin weaving between the posts, or transfer the warp to the tensioning device of your choice.
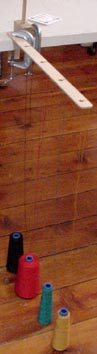
This photo shows the warp tensioned on a simple loom consisting of a board, a vertical post at one end, and a 2" C-clamp functioning as a vertical post at the other end.
 Attach the warping wand to the table just behind the left-hand warping post. Clamp the wand at a right angle to the long table edge. Place the clamp post-end down so it is out of the way. The warping wand helps keep the yarns from tangling during warping.
 To thread the tablets, thread one warp end through similarly-placed holes in all the tablets at once. Pull the end of yarn about two feet past the tablets. Repeat with the other three ends (one end through all of the A holes, one end through all of the B holes, etc.) If threading for the double-faced weave, put the background color in A and B, and the design color in C and D.
 Pick up the threaded pack of tablets. Bring your left hand under the yarns to the left of the pack, and pinch the four strands. Then rest the pack in your left palm. Make sure the pack is threaded to the left (as shown, with all four strands of yarn visible on the left side); flip it if necessary.
 Take the tablet at the bottom of the pack and slide it away from the pack, toward the right-hand post. Let go of the tablet. As you drop the tablets, don't worry if they flip or turn. You will arrange them after you finish warping.
 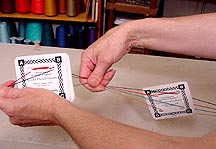 Use your right hand to grasp the four strands of yarn between the pack and the tablet you just dropped, and transfer the tension to your right hand.
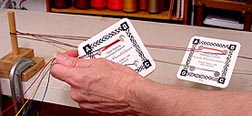
 This photo shows the warp tensioned on a simple loom consisting of a board, a vertical post at one end, and a 2" C-clamp functioning as a vertical post at the other end.